
Hi everyone,
This is a write-up of my open-data station: an SBM-20 in a GGreg20_V3 front end, an Olimex ESP32-POE-ISO-EA-IND doing the counting, and Home Assistant doing the uploading. Device ID 13000200, currently in Estonia.
The headline is that I did not write any firmware. The whole thing runs on stock ESPHome — about thirty lines of YAML — and that part went smoothly. What did not go smoothly was the obvious next step: having the ESP32 post its readings to the network directly. That is where I lost the most time, and it is the part of this post I would actually read if I were you.
Why I built it instead of buying
I was about to order a MODEL A. The configuration I had in the cart — Philips 18504 tube, Stevenson shield, DHL to Estonia — came to 880 USD with VAT. That is a fair price for a calibrated, weatherproof, supported instrument, and if you want an instrument, buy the instrument.
I wanted two things the stock unit does not give me: readings inside Home Assistant, and the ability to take the thing apart. So I went the other way, for about 150 EUR in parts.
What I gave up is worth stating plainly: no per-unit calibration, no warranty, and the weatherproofing is only as good as my own work. My data goes on the map as an open-data device, and that is the honest label for it.
The hardware
| Part | Why |
|---|---|
| SBM-20 Geiger tube | The classic. Good gamma sensitivity, cheap, ~108 mm of active length, and the network already has plenty of them, which makes my readings comparable to my neighbours’ |
| GGreg20_V3 by IoT-devices (Kyiv) | 400 V HV converter and pulse shaper on one board |
| Olimex ESP32-POE-ISO-EA-IND | ESP32 + Ethernet + 802.3af PoE, external antenna, industrial temperature grade |
| 3D-printed enclosure | Currently indoors; see the honest status section below |
On the Geiger front end
I deliberately did not use one of the cheap CAJOE RadiationD-v1.1 boards. They work, and they are about 25 USD cheaper, but the pulse output is pulled to 5 V, so you need a divider or a level shifter before an ESP32 GPIO, and the HV regulation wanders.
The GGreg20_V3 drives its output at 3.3 V logic levels directly (active-low), fixes HV at 400 V, and has reverse-polarity protection on the power input. For something meant to run unattended for years, that is worth the difference. It takes 3–5.5 V and draws about 35 mA at 5 V.
On the controller
Three properties made the Olimex board right for an outdoor station:
PoE 802.3af. One cable carries data and power. No mains socket outdoors, no second gland in the enclosure. Note that real 802.3af needs at least 37 V at the input — the cheap passive 12 V “PoE” injectors will not power this board.
3000 VDC galvanic isolation. This is the “ISO” in the name, and it is the part people skip. An Ethernet run to a mast picks up induced noise and ground potential differences between two separately earthed points. The isolation protects both the board and the switch at the other end.
I took the -EA variant for the external antenna. I do not need Wi-Fi on Ethernet, but the U.FL connector keeps the option open, and it is what you want if the board ever ends up in a metal box.
Wiring
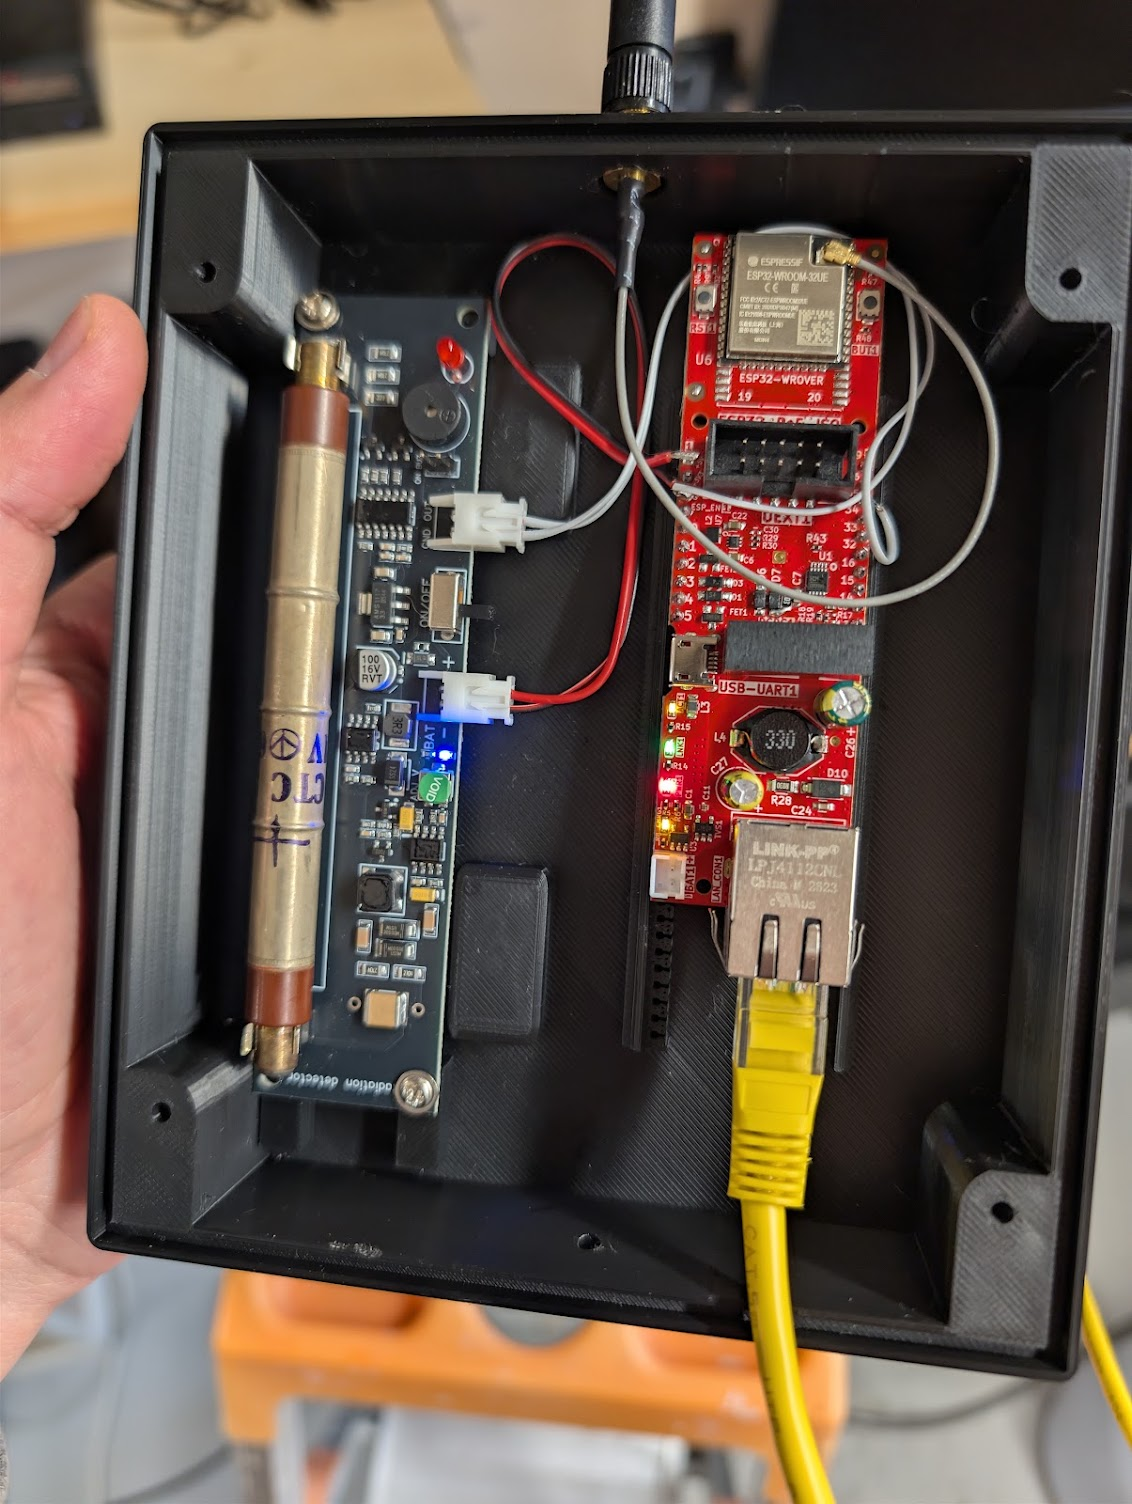
The GGreg20_V3 has two 2-pin JST-XH connectors, and the kit with cables includes leads for both, so there is no soldering at all.
GGreg20_V3  BAT +  ->  ESP32-POE-ISO  5V
GGreg20_V3  BAT −  ->  ESP32-POE-ISO  GND
GGreg20_V3  OUT    ->  ESP32-POE-ISO  GPIO35
GGreg20_V3  GND    ->  ESP32-POE-ISO  GND
Four wires, two of which are ground. The two connectors are independent, so both grounds go to the board — that is normal, not a mistake. You can see all four in the photo above, crossing the gap between the boards.
Pick your GPIO carefully. This is not obvious and it is easy to get wrong:
- GPIO36 and GPIO39 (SENSOR_VP / SENSOR_VN) look attractive because they are input-only, but the ESP32 has a documented erratum where ADC1 or Hall sensor activity produces spurious transitions on them. For a pulse counter that means phantom counts. Avoid.
- GPIO12 is the MTDI strapping pin and must be low at boot. On the Olimex board it drives PHY power anyway.
- GPIO35 is input-only, carries no strapping function, and is not affected by that erratum. That is what I used.
- On the Olimex boards, check the pinout for your revision — GPIO15/2/14/5 are multiplexed with SPI and the SD card slot, GPIO13/16 with I²C on the UEXT header.
One thing to check on your own board: GPIO34–39 have no internal pull-ups or pull-downs at all, so if the pulse line needs one, it has to come from somewhere else. IoT-devices specify the GGreg20_V3 output at 3.3 V HIGH / ~0.7 V LOW and state in their own example that the module provides the pull-up on its side, which is why pullup: false is correct here and why an input-only pin works. If your counts are absent or erratic on a GPIO34–39 pin, put a 4.7–10 kΩ resistor from the pulse line to 3.3 V before you go looking for anything more exotic.
And pull the J1 jumper to disable the buzzer. Inside a sealed enclosure it is useless and it draws current.
The part I got wrong first: uploading from the ESP32
The natural design is for the station to talk to the network itself. ESPHome has an http_request component, the EXP protocol is a single HTTPS POST, and it is maybe fifteen lines of YAML. I built that first, and it worked — for a while.
Then the device started rebooting. Not immediately, not predictably, but often enough that the station had visible gaps. I never caught a clean core dump, but the pattern pointed at memory: free heap trending down after upload cycles rather than returning to where it started, and reboots clustering after periods of activity rather than idleness.
My setup made it worse than most. I upload to three destinations — uRADMonitor, Radmon.org and GMCmap — so every cycle meant three TLS handshakes in a row, back to back, on a WROOM module with no PSRAM, while the Ethernet stack and the Home Assistant API connection were also holding buffers.
Turning verify_ssl off helped but did not fix it, and it is a real security downgrade rather than a tuning knob, so I did not want to keep it.
This is a known pattern
Once I went looking, the ESPHome issue tracker had plenty of company. These are the ones that matched what I was seeing:
- esphome/issues#5149 — http_request not releasing resources (https post only). The clearest of the set. The reporter shows free heap steady at ~35 000 bytes, drops to ~22 000 on the first HTTPS POST, and never comes back. The identical request over plain HTTP costs nothing. Open since November 2023, currently labelled stale.
- esphome/issues#5951 — ESP32 reboots after few http requests
- esphome/issues#4569 — ESP32 Crashes when making HTTP Request over Internet
- esphome/issues#2853 — Crash on http_request.post
- esphome/issues#5955 — http_request GET memory leak, specifically with
capture_response: true - esphome/esphome#11578 — Memory leak in http_request on HTTP errors. Worth knowing about: error responses leak, and the uRADMonitor endpoint answers 200 even when it rejects your payload, so you may be generating errors without realising it.
- esphome/esphome#13413 — SSL cert verification attempted despite verify_ssl false
The underlying mechanism is not really ESPHome’s fault. On ESP32, mbedTLS allocates from internal RAM by default, not from PSRAM, and a handshake needs a large contiguous block of it. Espressif’s own FAQ lists mbedtls_ssl_handshake returned -0x2800 under “usually caused by insufficient memory”, and documents the mbedTLS memory-optimisation options you would reach for — dynamic TX/RX buffers, dropping the peer certificate after the handshake — none of which are exposed as ESPHome YAML.
There is also a cost I had not thought about: verify_ssl: true compiles ESP-IDF’s full Mozilla root CA bundle into the firmware. That is the correct default and I would not turn it off, but it is not free.
What I changed
I deleted http_request from the ESPHome configuration entirely.
Now the ESP32 does exactly one job: count pulses and publish entities over the native Home Assistant API on the local network. No TLS on the device at all. Home Assistant — which has a real CPU, real RAM and a real TLS stack — does all three uploads.
SBM-20 + GGreg20_V3
        |  pulse
   ESP32-POE-ISO (ESPHome)
        |  Ethernet / PoE, native API, no TLS
   Home Assistant
        |  rest_command
   uRADMonitor  +  Radmon.org  +  GMCmap
The station has been stable since. It is also easier to work with: adding a fourth destination is five lines of YAML rather than a firmware rebuild, and when an upload fails I get an automation trace instead of a reboot. I left the ESPHome debug platform in place afterwards, publishing free heap and heap fragmentation as diagnostic entities, so if anything starts eating memory again I will see it on a graph rather than infer it from gaps in the data.
If you do not run Home Assistant, none of this applies directly, and posting from the device is still the right architecture — just watch your free heap, keep the number of TLS endpoints low, and consider a WROVER module with PSRAM.
ESPHome configuration
Counting only. Nothing here talks to the internet.
substitutions:
  device_name: olimex-radmon
  tube_factor: "0.0057"     # SBM-20: 0.0054...0.0092 uSv/h per CPM
  pulse_pin: GPIO35
  count_interval: 60s

esp32:
  board: esp32-poe-iso
  framework:
    type: esp-idf
    advanced:
      minimum_chip_revision: "3.1"
      sram1_as_iram: true   # a little more IRAM to work with

ethernet:
  type: LAN8720
  mdc_pin: GPIO23
  mdio_pin: GPIO18
  clk:
    pin: GPIO17
    mode: CLK_OUT
  phy_addr: 0
  power_pin: GPIO12

logger:
  level: INFO

api:
  encryption:
    key: !secret api_key
  reboot_timeout: 0s        # do not reboot when HA is briefly unreachable

ota:
  - platform: esphome
    password: !secret ota_password

debug:
  update_interval: 300s

sensor:
  # ---------- pulse counter ----------
  - platform: pulse_counter
    id: cpm
    name: "Radiation CPM"
    pin:
      number: ${pulse_pin}
      inverted: true
      mode:
        input: true
        pullup: false
        pulldown: false
    unit_of_measurement: "CPM"
    accuracy_decimals: 0
    state_class: measurement
    icon: "mdi:radioactive"
    use_pcnt: true
    internal_filter: 4us    # MUST be shorter than the 10 us pulse - see below
    count_mode:
      rising_edge: DISABLE
      falling_edge: INCREMENT
    update_interval: ${count_interval}

  # ---------- averaged CPM, sent to GMCmap as ACPM ----------
  - platform: copy
    source_id: cpm
    id: cpm_avg
    name: "Radiation ACPM"
    unit_of_measurement: "CPM"
    accuracy_decimals: 1
    state_class: measurement
    filters:
      - sliding_window_moving_average:
          window_size: 5
          send_every: 1

  # ---------- smoothed dose rate, for graphs ----------
  - platform: copy
    source_id: cpm
    id: dose_rate
    name: "Dose rate"
    unit_of_measurement: "µSv/h"
    accuracy_decimals: 3
    state_class: measurement
    filters:
      - multiply: ${tube_factor}
      - sliding_window_moving_average:
          window_size: 5
          send_every: 1

  # ---------- instantaneous dose rate, for alerts ----------
  # Reacts to a spike within one counting cycle instead of five.
  - platform: copy
    source_id: cpm
    id: dose_rate_raw
    name: "Dose rate instant"
    unit_of_measurement: "µSv/h"
    accuracy_decimals: 3
    state_class: measurement
    filters:
      - multiply: ${tube_factor}

  # ---------- diagnostics ----------
  - platform: debug
    free:
      name: "Heap free"
      entity_category: diagnostic
    fragmentation:
      name: "Heap fragmentation"
      entity_category: diagnostic

  - platform: uptime
    name: "Uptime"
    entity_category: diagnostic

binary_sensor:
  - platform: status
    name: "Online"
A few notes on that.
pulse_counter reports in pulses per minute regardless of update_interval, so with a 60 s interval the value is already CPM and there is nothing to scale.
inverted: true together with falling_edge: INCREMENT means the counter increments on the rising edge of the original active-low signal. One count per pulse either way, but worth knowing which edge you are on.
I keep the accumulated dose in Home Assistant rather than in an integration sensor on the device. ESPHome’s integration platform can restore its value across reboots, but the documentation warns plainly that the option wears out the flash — and on a station meant to run for years, that is not a formality. Home Assistant’s utility_meter puts the same number in a database instead.
The debug platform is not decoration. Free heap and heap fragmentation are exactly the two numbers that told me the direct-upload design was in trouble, and they are worth having on any ESP32 that talks to the internet.
Finally, reboot_timeout: 0s on the API. By default an ESPHome device reboots when it cannot reach Home Assistant for fifteen minutes. For a monitoring station that is precisely backwards — I would rather it kept counting through an HA restart.
Gotcha: internal_filter must be shorter than the pulse
If you take one thing from this post, take this one. It is the single line most likely to leave you with a station that reports a confident, permanent zero.
The instinct is to debounce using the tube’s dead time. SBM-20 is about 190 µs, so internal_filter: 190us looks right. It is wrong twice over, and the correct answer is in the opposite direction from where the instinct points.
Dead time is not pulse width. The GGreg20_V3 does not pass the raw tube pulse through — it shapes it into a clean 10 µs output and can sustain 100 kHz, far faster than the tube can produce events. internal_filter discards pulses shorter than its value, so a 190 µs setting is nineteen times longer than the pulse it is meant to be cleaning up, and it throws away every single count.
With use_pcnt: true the ceiling is 13 µs anyway. The ESP32 hardware pulse counter filters with a 10-bit value clocked at APB 80 MHz, so the maximum is 1023 / 80 MHz ≈ 12.79 µs. ESPHome refuses anything larger at validation time.
And here is the trap: 13 µs is also the default, applied whether or not you write the line. So “just leave internal_filter out” is not a safe answer either — the default is still longer than the 10 µs pulse. You have to set it explicitly, and set it below the pulse width.
I run internal_filter: 4us. That leaves comfortable margin under the 10 µs pulse while still rejecting genuine electrical noise.
This is subtle enough that the module’s own vendor tripped over it. In the official IoT-devices ESPHome example, both use_pcnt: False and internal_filter: 190us are commented out — disabled on 2024-12-30 after their own issue #5 — which quietly leaves the 13 µs default in place.
If in doubt, watch the logs. Background on an SBM-20 should be roughly 20–30 CPM. A steady zero on a tube you can hear ticking means the filter is eating your pulses.
Gotcha: the EXP payload goes in the URL, not the body
Writing this one down mostly so the next person finds it by searching the error string.
The open data upload tutorial contradicts itself. The firmware section passes the field string as the second argument to client_http_post() with NULL for the body — that is the URL variable part. But the manual-upload section shows this:
curl -X POST https://data.uradmonitor.com/api/v1/upload/exp/ \
  -H "X-User-id:YOUR_USER_ID" \
  -H "X-User-hash:YOUR_USER_KEY" \
  -H "X-Device-id:131234AB" \
  -d "01/1719228914/02/23.5"
I followed the curl example, because that is the copy-pasteable one. Every request came back HTTP 200 with:
Field 01 was right there in the body. The fields have to be path segments, and the body has to be empty.
This fails:
This works:
Note that the status code is 200 either way. The server answers 200 and puts the rejection in the body. If your monitoring keys off the status code, you will believe you are uploading while the server discards everything — and per esphome/esphome#11578 above, if you are posting from the device you may be leaking memory on every one of those “successful” errors.
The Home Assistant side
rest_command:
  urad_upload:
    url: >-
      https://data.uradmonitor.com/api/v1/upload/exp/01/{{ now().timestamp() | int }}/0B/{{ cpm }}
    method: POST
    headers:
      X-User-id: !secret urad_user_id
      X-User-hash: !secret urad_user_key
      X-Device-id: !secret urad_device_id
    timeout: 20
    verify_ssl: true
No payload, no content_type. And in the automation:
actions:
  - action: rest_command.urad_upload
    data:
      cpm: "{{ states('sensor.olimex_radmon_radiation_cpm') | int(0) }}"
    response_variable: urad_resp

  - variables:
      urad: "{{ urad_resp | default({}, true) }}"
      urad_status: "{{ urad.get('status', 0) }}"
      urad_body: "{{ urad.get('content', 'no response') }}"
That default({}, true) matters. If the request fails, Home Assistant still creates the response variable and sets it to None, so a plain is defined check passes and every downstream template silently renders as None. The second argument makes the filter substitute on any falsy value, None included, which turns invisible failures into visible ones.
I upload every five minutes. Field 01 must be strictly increasing, which a wall-clock timestamp satisfies naturally.
One field I deliberately do not send: 10, the tube type. Radu published the tube list on the forum — SBM20, SI29BG, SBM19, LND712, STS5, SI22G, SI3BG, SBM21, SBT9, SI1G — but the header with the actual enum values is not in the public tutorial, so I cannot tell whether SBM-20 is index 0 or 1. Guessing wrong would have the server convert my CPM with SI29BG’s factor of 0.010000 instead of SBM-20’s 0.006315, inflating my dose by about 58 %. The field is optional. I left it out until I can confirm the number.
Calibration, or the lack of it
My conversion factor is 0.0057 µSv/h per CPM, near the low end of the 0.0054–0.0092 range IoT-devices suggests for the SBM-20. Background here reads 14–17 CPM, which works out to roughly 0.08–0.10 µSv/h.
uRADMonitor’s server-side factor for SBM20 is 0.006315, so the dose on the map will not exactly match the dose in my Home Assistant. The CPM is the same number; only the derived value differs. That is two constants, not a fault, and it is worth understanding before you go hunting for a bug that is not there.
Whether either factor is right is genuinely open — there is a forum thread and a GitHub issue comparing network stations against official German BfS reference stations suggesting the real figure may be nearer 0.0042. Give any new station a full day before drawing conclusions. Background is a Poisson process; ten minutes of data tells you nothing.
Honest status
The station currently lives in the 3D-printed enclosure you see above, next to a window. It is not outside yet.
I know what is missing — a Stevenson shield for the tube, a properly sealed box for the electronics, a desiccant pack, a drip loop on the cable — and I have the parts. But I would rather publish a station that is running and honestly indoors than imply a weatherproof installation I have not finished. A tube behind glass reads a little low on the cosmic component and is blind to whatever the window blocks, so treat my numbers as a prototype’s.
The printed shell is a compromise I will revisit too. Right now the tube shares a box with the electronics, which is convenient and keeps the pulse run short, but the plan is to move the SBM-20 out into a louvered radiation shield and leave only the boards in the sealed enclosure. The tube needs air and shade; the electronics need neither.
Next steps: north wall, PoE up to it, Ethernet surge protection at the entry point. I will follow up when it is done.
What I would tell someone starting today
If you already run Home Assistant, this is a much shorter path than writing firmware, and it sidesteps the TLS memory problem entirely by never doing TLS on the microcontroller. The only real code in this whole project is a Jinja template.
And whichever architecture you pick: put the EXP fields in the URL, leave the body empty, and check the response body rather than the status code. That is the paragraph I wish I had read first.
Sources and references
- Open data upload tutorial (DIDAP / EXP protocol)
- uRADMonitor KIT1 source, GPLv2
- Tube conversion factors, forum thread
- Olimex ESP32-POE-ISO — open hardware, schematics, manual
- GGreg20_V3 with ESP32 — official ESPHome example
- ESPHome pulse counter documentation
- ESPHome http_request documentation
- Espressif ESP-FAQ: Mbed TLS
Happy counting,
Pavel
codemore code
~~~~