When I received my URAD Monitor, I was trying to think of the best placement where it would satisfy the requirement to be outdoors but still remain close to a power source. Having worked with PoE WiFi devices before, I contacted Radu to mention a PoE solution I was considering. Since I was able to successfully power my uRAD Monitor via PoE, I documented how I was able to achieve this in hopes it can be of use to others who may be interested in using PoE.
10/100 Ethernet can run off of just 2 pair (four conductors), which leaves the other 2 pair unused. Passive PoE leverages the unused pairs and sends power over them.
First, keep in mind that there will be some loss of voltage as you add distance. Assuming 24AWG Ethernet, using 4 conductors (2 pair) for power, a current draw of .160A, and a distance of 10 Meters, the loss should only be about .13 Volts. There are calculators online to help you determine the loss (which is how I came up with this value). Since we are working with less voltage than is typically found in PoE, the voltage drop percentage will be more severe per meter since lower voltages are more greatly affected by the resistance in lengths of wire.
The uRADMonitor uses 2.1mm DC Barrel Jacks (which are common) and you should be able to use “Passive PoE Injector Cables”, like the cable sold by SparkFun: http://www.adafruit.com/product/435 (as an example). However, I opted to purchase DC Barrel Jacks with Screw Terminals (which you can find for a few dollars on ebay). However you decide to use PoE, use a multimeter to make sure that the polarity of the barrel jack is not being swapped, and that power is not inadvertently being sent through the cat5 connector which may damage your device. Avoid using connectors/adapters that are not designed to be used together as they may be built differently or utilize different pairs. Don’t use a standard PoE power supply as it may be designed to send 12, 24, or 48 volts.
Since the cable will be partly outdoors, it is ideal to use outdoor UV Stabilized Ethernet cable (I happened to have Ubiquity TouchCable on hand). Strip a generous amount of cabling because you will have to start over is your Blue/Brown pairs are too short.
- If your cable has an uninsulated ground wire like mine did, just cut it off
- Break out the Blue and Brown pair, leaving them long so they can be used for power
- Shorten the Orange/Green pair since they will be going into the RJ45 connector


Terminate the end per the T568B wiring order, but only using the Orange and Green pairs:
Pin1: White/Orange
Pin2: Orange
Pin3: White/Green
Pin6: Green
Pins 4/5/7/8 will be empty in the RJ45 connector. The Blue and Brown pairs should be stripped at the end and twisted together. Optionally you can use a small amount of solder to fuse them together, but don’t use too much or they may not fit into the DC connectors.

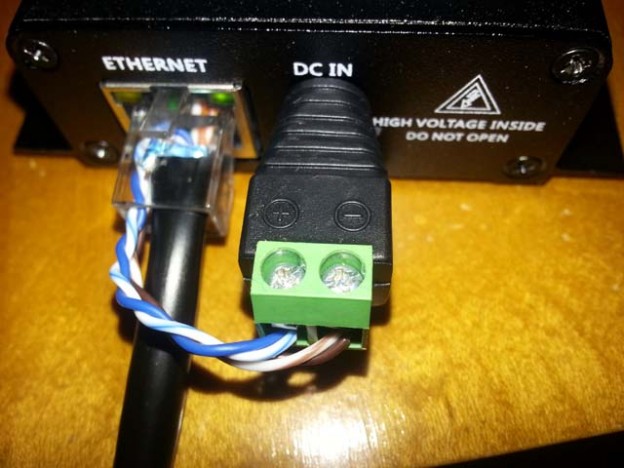
I used the Brown pair (normally pins 7/8) to carry Negative, and the Blue pair (normally pins 4/5) to carry Positive. This is in line with the IEEE 802.3af using spare pairs standard. Insert the stripped wires into the connectors and tighten them down firmly. You will do the same thing at both ends, using a male DC jack on one the uRADMonitor end of the cable, and a female DC jack on the network end. You should end up with something like this:
(Don’t forget the cable is easier to feed through holes BEFORE you terminate it, as I forgot!)
Verify the polarity on the uRAD end remains correct after traveling through your cable by using a multimeter. On the device side, I had barely enough cable length to be able to reach the DC port. On the indoor side, I used the included USB to DC Barrel Jack cable that came with my device to connect my terminated cable to a power source. The router I use happens to have have a powered USB port which I was able to use to power my uRADMonitor.


I opted to add a little hot glue to the back of the connectors to keep moisture out.

Why not using a 9 or 12V PSU and between it and the ethernet cable input, using a step-down buck power converter tuned to give exactly 5V on the other side of the etherned cable that goes to the device?… I think it should work for cables longer than 10m if the power drop is getting out of the minimum limit 😀
That’s a great idea, Radu also mentioned this to me. The only tricky part is that the converter is going to need to be near the device and would need to be protected from the elements. I plan on doing some real world testing to see how great the voltage drop actually is (with the load attached), though its nice to know the native voltage can be used at short distances at least.
If the step-down converter is adjustable, it need not be near the device. It can be all the way back at the power supply side. You would simply need to adjust the voltage higher on the converter so that you’re still getting the desired voltage at the device end of the cable.
This is really cool! I have several surplus PoE injectors, and I’m definitely going to implement this.
I realise this is an old thread but I’m using one of [these](http://www.ebay.com.au/itm/231364769857) 5V 802.3af PoE adapters, off my PoE switch and it works a treat. Its output is about 5.4v and the switch reports that it’s drawing 1.079W; Radu said that it should be lower than this, about 0.65W for a Model A, so I’m assuming that there is more loss in conversion than they quote (it’s rated at 81% efficient) – regardless, 1W is next to nothing.
I agree, that looks like a nice POE adapter. Did you try the Dashboard?
Old, thread, but might add few tips as well – most of new PoE switches are ACTIVE PoE, i.e. they only work once negotiated power needs with end device, therefore get POE adapter that is fixed at 5V and supports ACTIVE POE 802.3af or 802.3at.
If would be great, that future urad devices would support POE without any adapters.