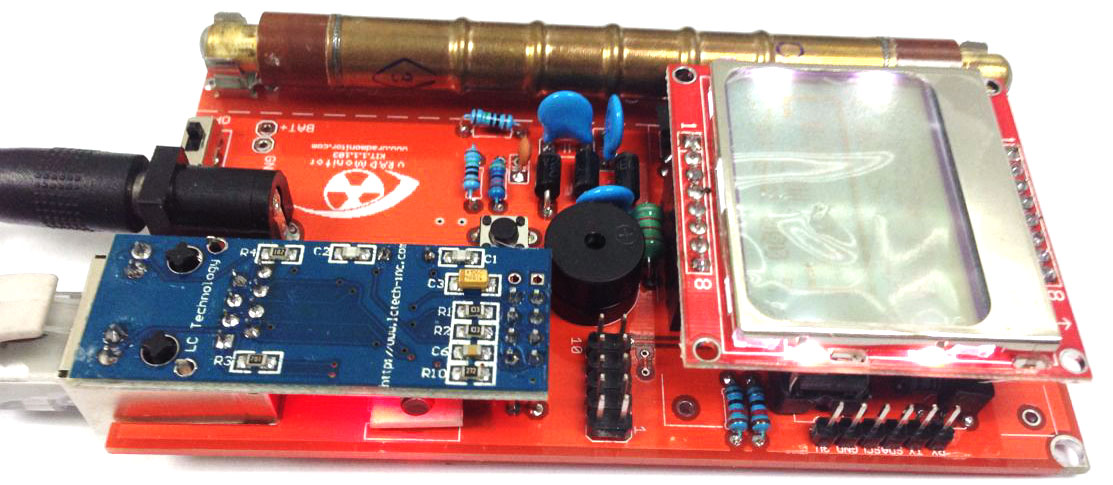
The uRADMonitor network started as a worldwide array of ionising radiation detectors, to deliver comparable radiation readings regardless of location. We’re now using the existing infrastructure to also include air quality measurements (the model D was a first step towards that). The first hardware detector we’ve built was the uRADMonitor model A, a fixed monitoring unit in a rugged aluminium enclosure suitable for outdoors use. During the model A development, we’ve received considerable feedback from users and some of that was shaped into a new hardware product: a unit that keeps the monitoring capabilities of the model A, but adds an LCD screen and a battery connector for mobile use. We offered this as open source, so anyone could build it and join the uRADMonitor project, and named it the KIT1.

The development saw several iterations. The goal was to simplify the development, while expanding the functionality. The high voltage Geiger tube inverter changed from a transformer to a simple inductor and extension pins were added to allow connecting additional peripherals such as sdcards, gps receivers or other sensors. Finally, the forth iteration went into production, and we’ll see them on the market soon.

As said, this device is also offered as open source, and is available on Github. Details on the previous iterations are available at the links below:
2013 – prototype
2015 – kit1.0
2015 – kit1.1
For now, the KIT1 can be ordered on IndieGogo, or by requesting it on the Join-the-network page. In some special cases we can offer KIT1 evaluation units for free.
The software
Important changes were added to the KIT1 firmware as well:
[columns]
[column width=”one-third”]

When the unit is switched on, you will see the uRADMonitor logo just before the network interface is being initialized. If the network cable is not connected or you plan to use the KIT1 offline, press the main button.
[/column][column width=”one-third”]

The main screen shows a time counter in top-left, followed by 4 icons: sound, radiation event, network status, battery level. The second line shows the total dose accumulated and the battery voltage. The central label indicates the radiation dose and estimates the level as LOW, NORMAL, HIGH and DANGER. The last line shows the voltage on tube, the duty cycle and the dose as CPM
[/column][column width=”one-third”]

If the KIT1 was started in offline mode, the top network icon will show disconnected
[/column][column width=”one-third”]

Pressing the main button in the main screen, will advance to the next screen. This one is called the Stats screen, and shows the absolute time, total pulses counted, the average CPM since start, the maximum CPM recorded, and at the bottom the detector tube type and the firmware version.
[/column][column width=”one-third”]

Pressing the main button once again will go to the network screen, where you see the allocated IP, the gateway, the netmask, the server’s IP, the KIT1 ID. The last line shows number of pings received (try it), and the number of good and bad server replies.
[/column]
[/columns]
The speaker
The beeping sound is active only in the main screen. Leaving the unit in any other screen will mute the speaker. When connected to the network, the sound will be muted by default. To toggle mute on/off, press and hold the main button for at least 3 seconds then release.
The backlight
There is a timeout for the LCD backlight, currently configured to 10 seconds. Press the main button to turn the backlight on.
The watchdog
When used as a monitoring station, most likely the unit will run unattended. There is a watchdog mechanism that automatically reboots the unit in case of any lockdown. This approach is a proven technique that allowed uRADMonitor units to operated unattended for long periods of time, while providing valuable measurements. When connected to the uRADMonitor server (network on), the KIT1 will automatically reboot if during an interval of 10minutes, it receives no acknowledgement from the server.
The alarm
In the event of a high dose being detected (> 1.0uSv/h), the alarm will sound. Press the main button to stop it. Please note that the alarm will restart if the dose has not decreased back to normal levels. The alarm is disabled if the sound is muted.
The extension port

The extension port is a male header exposing 6 pins, namely the 3V, GND, SCL, SDA, TX and RX . It is now possible to add an BME280 / BMP180 to the KIT yourself and collect additional measurements on temperature, barometric pressure and humidity. There are many standard breakout modules available, from all kinds of suppliers, and could potentially use all the sensors that use a UART or I2C connection. Adding a new sensor will require changes in the firmware to make it work.
Radu,
I think you haven’t received my e-mail sent on May 18. I’d like to buy KIT1. Please confirm.
With best regards,
Robert
On Wed, May 18, 2016 at 9:38 AM, Molecular Descriptor wrote:
Hi Radu,
Thank you for detailed reply. To an electronic hobbyist like me model KIT1 is the most appealing. Please let me know how to order it. Also, please let me know when unit A3 becomes available.
With best regards,
Robert
Salut Radu, KIT1 comandat de pe IndieGogo vine cu firmware-ul gata scris in microcontroller sau nu?
Hi Radu, the KIT1 ordered from IndieGogo, does it arrives with the firware already written in the microcontroller or not?
Multumesc / Thank you
Salut Alin, da, firmware-ul e gata scris. Voi reveni pe email. Mersi!
How do we buy the kits? Is this project dead now?
The project in on a fast paced development, check the blog posts.
You can order a full kit on http://www.uradmonitor.com/join-the-network/ or get PCB’s made by the community, such as these http://www.uradmonitor.com/kit1-community-edition/
Is there any way to adjust contrast on the LCD? I have had a unit for a couple of years now and the LCD got dimmer & dimmer over that time & I just got it running again after moving house and the display is basically not working at all. The rest of the unit works well – it send to your website and the backlight works when I press the button. But I would like to get the LSD running again.
Or is it is standard module that I can order from somewhere?
Ah, answered my own question – found a blog posting that it is a Nokia 5110 module so I bought one online in AliAxpress and will install when it arrives.
Yes, the LCD is the Nokia 5110. Here’s another source: https://www.ebay.com/itm/84-48-LCD-Module-White-Backlight-Adapter-PCB-for-Nokia-5110-Arduino-AU/191736125787?hash=item2ca45d195b:g:mBQAAOSwa-dWnzM5 . These are quite common.