This tutorial shows how you can compile and flash the KIT1 firmware on Windows (at least Windows 2000) without going through all the hassle of installing and using Cygwin and Eclipse.
As an additional problem, there are several incompatible “make” implementations for Windows, so I decided to avoid “make” too. The AVR8 GNU toolchain does not have a make program, so this was a clear choice.
I have tested all the steps described here on a Windows2000 and a Windows7/64 machine, so that should run any Windows version.
You need:
- KIT1 Github code (you need at least version 1.23 to get something valid compiled)
- AVR8 GNU Toolchain installer
- AVRdude GUI for Win32
- USBasp USB programmer (comes with your KIT1)
- LibUSB driver for USBasp
- My KIT1 script pack
Installation:
- Run the AVR GNU toolchain installer. Specify any directory you like it to reside.
Hint: for Windows Vista and later, it is better to install it into your home directory:

It takes a while to uncompress the archive, so please be patient.
That’s how it looks after installer did its job, you can see the “avr8-gnu-toolchain” folder:

- Unzip the contents of the “AVRdude GUI for Win32” archive into a directory of your choice.
For convenience, I simply put them in the AVR\BIN subdirectory where I installed the AVR GNU toolchain.

Here shown with 2 Explorer windows, where you can copy by dragging all the marked files from the left to right window. - You need to add the BIN and AVR\BIN of the AVR GNU toolchain installation directory to the system’s PATH environment variable.
If your installation directory is your home directory as suggested, you need to add:
%USERPROFILE%\Documents\avr8-gnu-toolchain\avr\bin and
%USERPROFILE%\Documents\avr8-gnu-toolchain\bin
You find them by opening the control panel, then “System”, then “Extended System settings” (sorry, I don’t have an English system here, so the names are just rough guesses…)

Click on “Environment variables” (in German its called “Umgebungsvariablen”) and select “Path” from the list “System variables”:

Select “Edit” (in German it is called “Bearbeiten”)
Now, at the end of the existing paths (usually a very long line!), you append:Hint: Note the semicolon delimiters, they are important!
- If you decided to put the AVRdude files NOT in one of the two above folders, you’ll need to add that folder name too.
- Now plug in your USBasp dongle. Do not connect your KIT1 yet. Windows may complain about not finding any drivers. Ignore that.
Unpack LibUSB archive to a temporary directory and start
libusb-win32-bin-<version>\bin\inf-wizard.exe

After clicking “Next”, you’ll see a list of your USB devices. Find the one with Vendor ID 0x16C0 and Product ID 0x05DC, select that entry.

Click “Next”. At the next screen, you can name the device as “USBasp Programmer”.
Click “Next” and you get a file named “USBasp_Programmer.inf”.
For convenience, click on “Install Now…” to get the drivers installed right away. You’ll need to be an administrator on your computer. Let it install the drivers despite of the warning about the unverified manufacturer.
It needs some time to install, so please be patient. - Now is a good time to restart your computer to activate all the stuff.
Yes, I know, that’s not always necessary, but better safe than sorry. - Now unpack the Github “master.zip” archive to any directory you like. Be sure to keep the directory structure.
- Now unpack the contents of KIT1scripts.zip into the CODE subdirectory.

You’re all set up!
Setting up for your unit:
If you have a user id and key (you can check it on the dashboard) for your KIT1 unit, put them in the config.h file (located in the CODE subdirectory).
Find the lines:
and change them to (use YOUR key here):
Note 1: The USER_ID does need the qoutes around it!
Note 2: You can change other #defines too (e.g. BME280 and stuff)
Don’t forget to save the file.
Compiling:
- Open a command line console via “cmd /v” (use Windows-Key and R as a shortcut)

The “/v” thing is important. It enables some shell extensions needed for compilation. - Change to the code folder (where C.BAT is located) using the cd command:

- Enter “c”
There will be some warnings, which can safely be ignored. Check if the last lines look something like this:

- Congratulations! You just created your first selfmade KIT1 HEX file.
You will find the HEX file in the “code\Release” subdirectory as Release\uradmonitor-KIT1-self.hex
Note: The size of your selfmade HEX file size will differ a little bit to the original HEX file sizes. Nothing to worry about.
Flashing:
My KIT1 already came with a USBasp programmer. Hats off to Radu, very convenient!
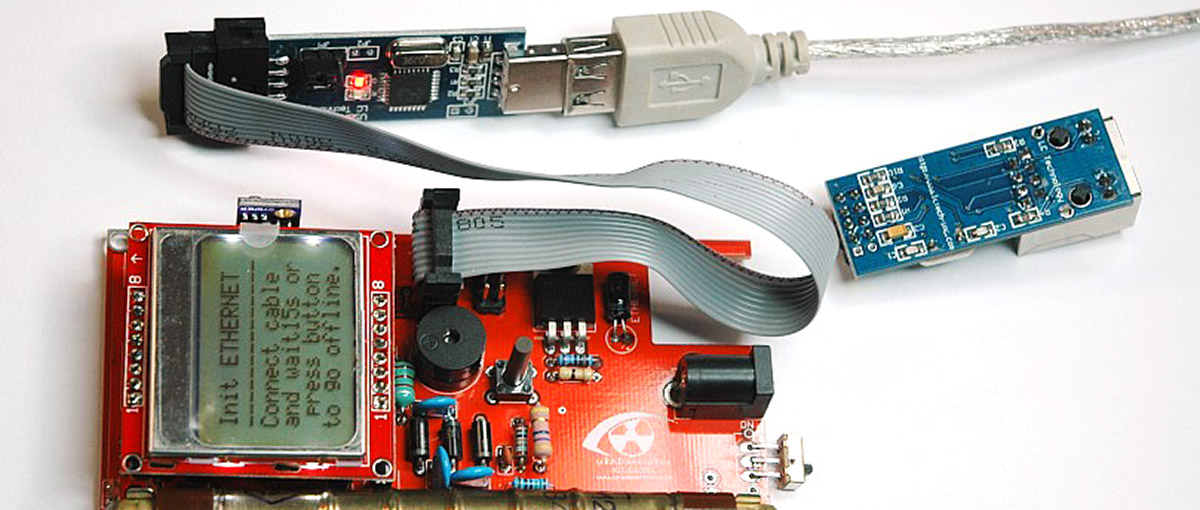
To communicate with the KIT1 processor, you plug the the USBasp cable into the 10 pin socket on the KIT1. The red strip on the ribbon cable should point to the PCBs border.
There is no need to apply external power to the KIT1 board, USBasp will supply that.

I highly recommend disconnecting the LAN module, since it shares the programming lines with USPasp. A second advantage of doing this is that the KIT1 firmware will not start the high voltage generation until it sees a network connection or you press the button. As long as you don’t press the button, you will not get zapped!
Note: Connecting USBasp to the KIT1 will not erase or modify anything in the processor. No worries.
If you have a KIT1 with the original firmware on it, you may as a first step first wish to save a copy of the flash and eeprom contents.
Doing so, you can always put the AVR back to the original state.
You can do this with the script “READORIG”:

The flash contents is stored in a file named uradmonitor-KIT1-orig.hex, the data EEPROM contents is saved to eeprom.hex.
To flash your newly compiled firmware into the processor chip, use the P command:

The process involves erasing, flashing, eeprom and fuse programming all in once.
It takes a few seconds to complete. After that, disconnect USBasp from the KIT1 board, reinsert the LAN module, and you are ready to go!
Happy compiling!

codemore code
~~~~